Posts

Showing posts from October, 2022

Subscribing to my Blog

Image
Some of you have asked me how to subscribe to my blog. I've added widgets that make it easy to do this. Both are under the terribly designed hamburger menu. Click here: And from there you can find the subscription links:

Some Little Cleanup (A Small Update)

Image
I've plugged back in the CPU board, and the machine seems to boot reliably. Still the music is intermittent at boot, but I don't know if that's a serious problem yet. I'm still digging. For now, with the stable power supply, I feel most of the back cabinet's boards are mostly sorted out as I only have left the playfield power board, and that will be hard to debug while I'm working out the rest of the wiring issues. Two things that were really bugging me was a wiring issue from the power supply, and the battery backup system. Starting with the power supply wiring, one of the first things I noticed in the backbox was the presence of a bunch of wire nuts: This type of thing in a pinball machine, while not unheard of, is definitely not how it shipped from the factory. It's clear that at some point and time, someone decided to cut one of the power connectors. I can't think why someone would do this, but here it is in my machine. While this might be "good

Chips and Boards (mostly not OK!)

Image
 So, after mucking around with the CPU, I'm looking at the power supply. The previous owner of this machine doesn't know how capacitors work. It turns out, that almost half the values of the capacitors on this power supply were the wrong value. Perhaps that's the source of lots of my problems. I ordered a kit from someone on pinside.com  (it's easier than farting around on Digikey), and replaced the capacitors. Someone had been there before me, and pulled up a pad or two. I worked around that by running the leads where the traces weren't. (The eagle eyed among you might notice that not all the mounting screws are in place. That seems to be a common problem in my machine – not enough connections to ground. I'm ordering a bunch of screws from McMasterCarr to fix this.) Putting the power supply back in place, and turning on just the power supply has all the test points registering voltages at what I consider "in range". That's good. As I slowly plugge

Chips and Boards (mostly OK!)

Image
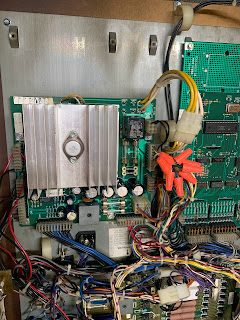
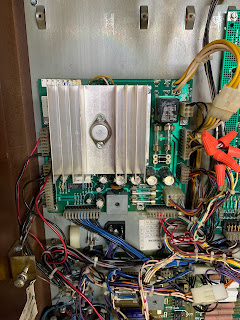
 I have been debugging lots of problems in the machine. First, some good news, I've gotten the screen working. I've replaced it with a completely new one: I have a few problems with it, but that'll be for another post. Tonight's post is about CPUS. Have Iron, Will Travel Part of debugging the screen has me questioning that the CPU board is in good shape. I'm pretty sure the power supply isn't helping (again, more later), but I decided to take the CPU board out, and see if I could see anything obviously wrong with it. The CPU board was largely in good shape. You will note, there's a battery pack on it. This needs to be removed because, over time, the batteries leak, and put an alkaline all over the board. While this doesn't immediately ruin a board, over time it well. So, that's coming off: Otherwise, as I inspected the board, I didn't see any obvious problems. The capacitors all looked good, the chips all looked good, the transistors all tested w

550-5038-01 (part 2)

Image
So, after much futzing about, I've finally managed to print a replacement part: From left to right, the parts are: my left-hand replacement, the right-hand prototype, and the original right-hand ball return. It took me a couple of days to get right, but I think I've settled on a way to do it. PETG vs PLA Besides a few small forays into ABS, generally when I've used my 3D printer, I've printed PLA. I knew I wanted my part to be transparent (or translucent), and from internet research, it seems PETG and ABS offer the better translucent filaments. Besides the new filament, printing something transparent is quite difficult – there's lots of futzing about with printer settings, and this part was no exception. But I can say, I feel like I was quite successful. The part I've managed to print is pretty clear, and it is solid as a rock. I doubt this thing is going to break anytime soon. I've decided to print a second one for the right-hand side, replacing the slightl

550-5038-01 (part 1)

Image
 Well, I've started taking apart the playfield, and in the process, dealing with that broken part . Here, I'm going to detail what I've gotten up to trying to fix it. Accurately Modeling The Part In my pinball machine, there are two flippers at the bottom. Both of them have unique guides with unique part numbers: It seems like the left and right side are mirrored images of each other. So, I took the mostly complete right side guide, and scanned it on my neighbor's scanner: From here, I used the ruler scale the image in Fusion360 (cad software), and traced the outline of the part: I was able to recreate a bunch of the dimensions in inches, and they are generally sensible numbers, like 1 1/12 inches, 1/4 inch, etc: From here, I was able to extrude this object into a 3D shape, and get it ready for printing: And I printed the part to test that it would work: Everything lined up perfectly, and the part looks great! Stay tuned for part 2 of this, when I try printing in clear

Assessing The Work

Image
So, I've finally got the machine unpacked. Right now, it's sitting on the borrowed dolly as attaching the legs to it will put it too high in my basement to open and close the playfield. I've got the dolly lowered to about 19" off the ground. Tomorrow, I'll have to build two little saw horses to hold the machine at that height so I can return the dolly. Turning It On So, I had taken a look at the guts of my machine, and to my untrained eye, I didn't see much wrong with it. I decided to turn 'er on and see what happened. Well, it booted! The sound sprung up, the lights turned on, and it seemed to start. The riverboat even turned a bit. Opening the coin door caused it to "moo" at me. Apparently my machine is alive, and it's a cow. It's not fully working, the flippers seem busted (I think it's a fuse), I don't have any balls to test a lot of it, etc. But, it's not dead. Displays & Parts Typically, when you put a pinball machine

It's Moved!

Image
 My awesome neighbor helped me move my machine, and it went smoother than I thought it might. More pictures to come soon on the state of the things, but I'm so happy I finally got it out of the car and into the basement. Stay tuned!

Every Plan is a Good Plan – Until the First Shot is Fired

I'm almost to the point where I can remove the pin from my car. I have had to rearrange a lot of my basement in anticipation of this project, and they guy selling it wanted the machine gone. I can't wait to get started. I had promised to discuss the project plan, and, without pictures, it will mean less to people, I'll do my best. Perhaps I'll do a followup post to discuss issues. Below is my project plan, copied verbatim from by Google doc: Guts of Machine: Investigate fuses Pg 4 of doc Figure out what that extra fuse is on the PSBoard. Can I buy that fucked up cable or do I need to remake it?No need to do this now, but start the process while you clean the playfield. This step likely requires parts. Take pictures! Stretch cable New (to me) cable Wire butt connectors Remove battery from PCBoard NVRAM? Check that ground strap, add to order below Playfield: (should be done early, stuff will be ordered from this) Remove everything. Take pictures! If you fuck up, the manu